Let’s Do Science!
Looking to bring the lab to your little scientists? Spark curiosity and encourage exploration with the Adler’s Let’s Do Science video series! Designed for families and educators, these engaging at-home experiments use household materials for fun hands-on, minds-on science activities. Experiments range from floating an egg in water to building a space-age lava lamp, and more! Go forth, explore more!
See what happens when oil, water, food coloring, and antacid tablets mix by making your own lava lamp!
At-Home Lava Lamp Supplies:
– Clean, empty plastic bottle (at least 12-16 oz)
– Flashlight
– Funnel
– 42 oz bottle of cooking oil (vegetable or canola work best)
– 3/4 cup of water
– Antacid tablets (at least 4)
– Food coloring
Step 1: Prep by pouring 3/4 cup water into the empty bottle. Use the funnel to avoid spills!
Step 2: Pour the cooking oil into the bottle until at least 2/3 full.
Step 3: Squeeze in 10 drops of food coloring and gently mix by turning the bottle in your hands. What happens to the food coloring?
Step 4: Drop in antacid tablets, like Alka-Seltzer, and see what happens! Start with a half or quarter tablet, and then try a full tablet. What happens to your oil/water/food coloring mixture?
Step 5: Bonus – Try it with a flashlight! Hold the flashlight on the bottom or top of the bottle. What do you notice?
Doing science with older explorers? Try more challenging missions:
– Try adding more than one antacid tablet. What happens to the rate of “bubbling” inside your lava lamp?
– Add more water and less oil to the bottle. How does that change the experiment?
– Try timing how long your lava lamp bubbles before settling down, depending on how many tablets you add. Track your results!
– Add several different colors of food coloring to the oil/water mixture. What you notice after you add the tablets?
Special thanks to the Lopez family for helping us with these awesome experiments!
Do some colorful science using materials you have at home!
Color Burst Experiment Supplies:
– 1 shallow bowl or dish (any size—larger is better)
– Q-Tips/Cotton Swabs
– Dish soap
– Small cup for soap (optional)
– Food coloring (red, blue, green, and yellow)
– Skim or 1% milk
Step 1: Pour enough milk into your bowl or dish so that the milk completely covers the bottom—a quarter inch is plenty.
Step 2: Choose a bottle of food coloring, and squeeze a few drops into the milk. Then, choose another color and squeeze some more drops in different locations in your bowl or dish.
Step 3: Pour a small amount of dish soap into a cup. Place one end of your Q-Tip into the soap.
Step 4: Take your soapy Q-Tip, and press the tip down into the milk near a spot of color. What happens to your colors?
Step 5: Try multiple Q-Tips. How does that affect how the colors move around? Does the effect change over time? Have you ever seen anything else that looks like your “color burst”?
Doing science with older explorers? Try more challenging missions:
– Use a different kind of milk. Does the experiment change if you use whole milk instead of skim milk? What about half-and-half? Which one will “burst” the best?
– Try starting with water instead of milk. Does the color move around the same way in the water? What does milk contain that water does not? What about the milk makes it “burst” and churn around?
– Place colors near each other in the milk and predict what colors will form when they mix and churn together.
Do some egg-cellent science with materials you have at home!
Float an Egg Challenge Supplies:
– 3 empty glasses (clear, at least 12 oz or larger)
– 3 raw eggs
– 1 spatula or large spoon
– 2 cups of salt
– Lots of water!
Step 1: Prep by completely filling two glasses with water (leaving a little room at the top). The third glass can be filled about half-way.
Step 2: Draw faces on your eggs with a marker! Then, drop one egg in the first glass. What happens to the egg in normal water?
Step 3: Add one cup of salt to the second glass of water. Stir water with a spatula or large spoon. Drop the second egg in the second glass. What happens to the egg in saltwater?
Step 4: Add one cup of salt to the third glass of water. Stir. Drop the third egg. What happens to the egg? Slowly fill the glass with more water. Can you get the egg to float—or achieve buoyancy—in the middle of the glass?
Doing science with older explorers? Try more challenging missions:
– Try using a hard-boiled egg or other object that contains some air inside, then repeat the above experiment.
– Gather other testable objects and ask your explorers to predict whether that object will sink or float. Track your results!
– Try using a different liquid (like milk or juice), or change the temperature of the water. Does an egg float in really cold water?
Special thanks to the Lopez family for helping us with these awesome experiments!
Create a planetary surface made of Oobleck, then design and build a lander with materials you have at home!
Oobleck recipe:
– 1 cup of water
– 2 cups of cornstarch
– 4-8 drops of food coloring of your choice
Mix all ingredients together in a big bowl. Want a gooier Planet Oobleck? Add more cornstarch!
Doing science with older explorers? Try more challenging missions:
– Add an ‘astronaut’ to your landing craft. You can use a lock, a paperweight, or a board game figurine.
– Test if your craft can stay afloat for 15 seconds.
– Want to lift off and come back to Earth? Create a spacecraft that can safely house an ‘astronaut’, stay afloat for 15 seconds, and can be pulled out of the planet!
Winter is the perfect time to do fantastic frozen science! In this activity, create some “cool crystals” using regular household materials like water, epsom salt, watercolors, and a clean glass jar. When epsom salt is added to hot water (colored or clear) in a glass jar and stored in the fridge for a day or so, hundreds of delicate crystals will form.
Supplies:
-A clear glass vessel (large jar or votive holder)
-Water
-Epsom salt (unscented)
-Measuring cups (1 cup)
-Mixing spoon
-Microwave (optional)
-Liquid watercolors (optional)
Step 1: Measure about 1 cup of water and heat in the microwave so that it’s hot but not scalding (really hot tap water will also work). If using liquid watercolors for colored crystals, pour a few drops in now and mix with a spoon to blend. A little bit goes a long way!
Step 2: Measure an equal amount (1 cup) of unscented epsom salt. Pour into your glass vessel. Then, slowly pour in the hot water and mix with a spoon until the mixture mostly dissolves. This should take 1-2 minutes. You will not be able to dissolve ALL the salt; that’s OK.
Step 3: Place the solution in the freezer for about 10 minutes. Remove, and then place in the back of your fridge overnight.
Step 4: Remove the glass vessel. Carefully pour out the remaining liquid into the sink. You should see delicate crystal structures that have formed overnight! The crystals will continue to dry and should hold their form for several weeks. You can clean the inside of your jar/vessel to better see the crystals with a wet paper towel.
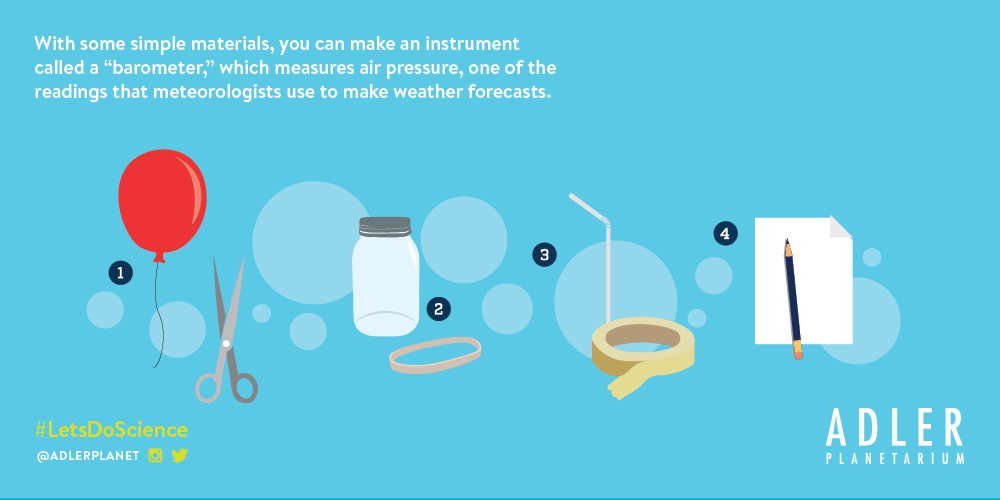
In this experiment, you will learn how to make your own barometer, a tool used by meteorologists to measure atmospheric pressure!
Supplies:
-A glass
-A straw
-A balloon
-Scissors
-A rubber band
-Tape
Step 1: Stretch the balloon by blowing it up and carefully letting out all the air.
Step 2: Cut off the neck of the balloon and stretch out the remaining piece across the glass, secure with the rubber band.
Step 3: Tape the straw onto the balloon lid about one quarter of a way on the lid, with the tape about 1 inch from the edge of the straw end sitting on the balloon lid (this will be your indicator “needle”)
Step 4: Place it next to a wall and tape a piece of paper or card to the wall behind it.
Step 5: On the paper, mark the current position of the straw. Arrange the paper so there is room above and below the straw so you can track the straw’s movements.
Step 6: Check the straw regularly, marking its new location on the paper and adding notes about the day’s weather (“rainy,” “windy,” etc.). What do you notice? Can you tell if and when the weather is about to change?
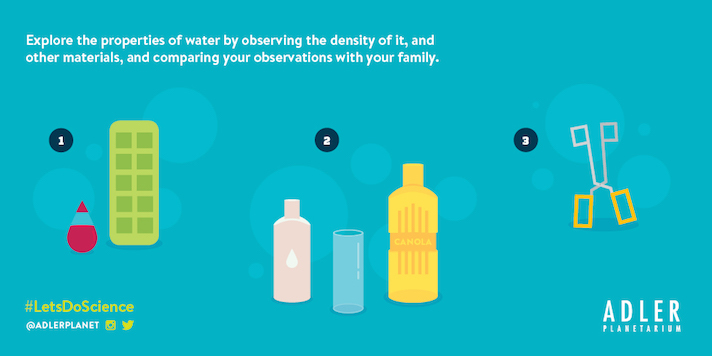
Water is an essential liquid on Earth that forms the lakes, streams, oceans, and weather, and is the foundation for most plant and animal life. Explore the properties of water by observing the density of it, and other materials, and comparing your observations with your family.
Step 1: Fill an ice cube tray with water and one drop of food coloring per cube, and freeze until solid.
Step 2: Fill half of a glass with vegetable oil, then the remaining half with baby oil. What do you notice?
Step 3: Using tongs, gently drop in a colored ice cube. What happens?
Step 4: After a short while, the ice cube will begin to melt. What do you notice about the water that melts from the ice cube?
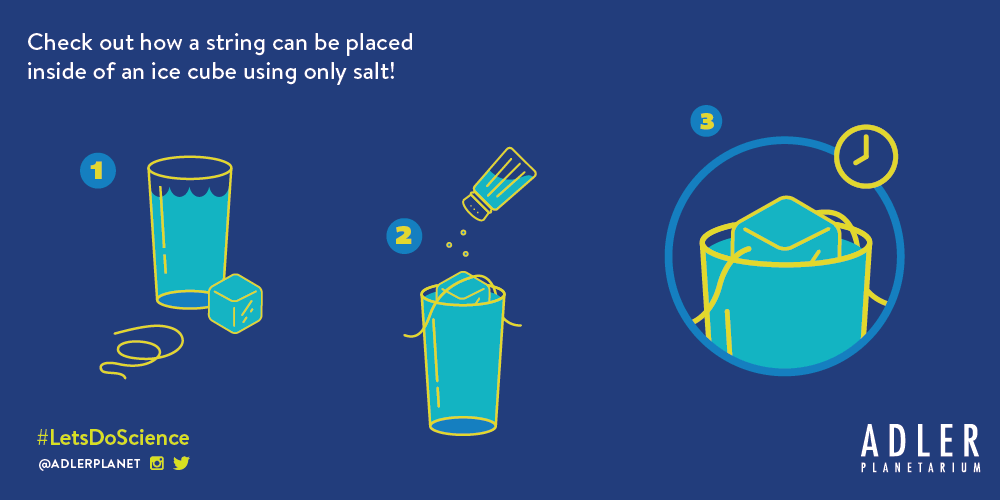
In this experiment, families can explore the strange properties of normal table salt by partially melting (and refreezing) an ice cube with salt so that a string can be placed inside the cube.
Supplies:
-A glass
-Water
-Ice cube
-String
-Scissors
-Kosher salt
Step 1: Fill a glass almost to the top with cool water.
Step 2: Place an ice cube in water, with an 8-10 inch string over the ice cube and edges of glass.
Step 3: Cover ice cube and string with salt. Wait a few minutes and pick up the ice cube!
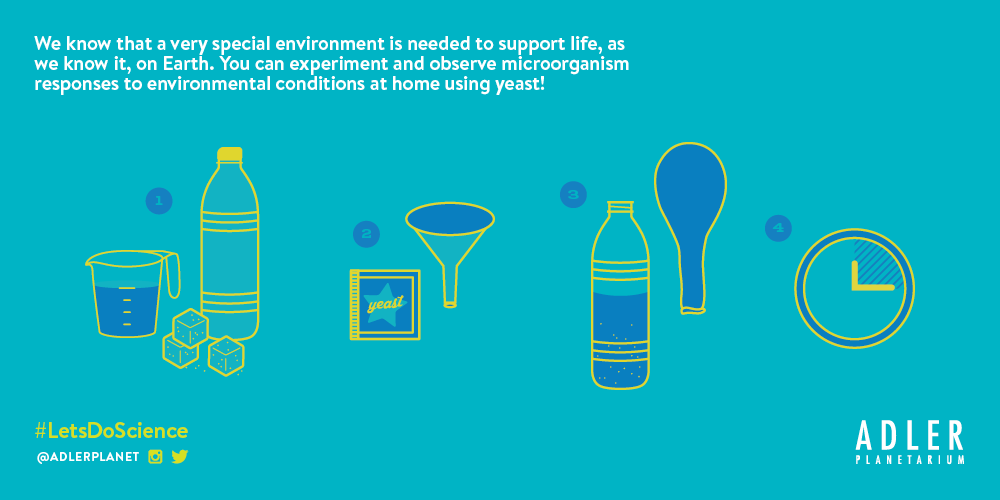
Life beyond Earth has been and continues to be a topic of conversation. NASA scientists look for signs of life in our Solar System and also look for signs of life on planets around other stars. Through this research, we know that a very special environment is needed to support life, as we know it, on Earth. You can experiment and observe microorganism responses to environmental conditions at home using yeast!
Supplies:
-1 c. warm water
-3 sugar cubs
-1/4 oz. package of yeast
-1/2 liter empty plastic bottle
-10-inch party balloon
-Small funnel
Step 1: Mix water and sugar in the bottle until the cubes have dissolved.
Step 2: Add the yeast using the funnel and gently swirl.
Step 3: Add the balloon to the top of the bottle.
Step 4: Measure the circumference of the balloon every 15 minutes, with a maximum circumference at 2 hours.
The above mixture simulates a healthy environment for the yeast to grow. Because of the environment and nutrients, the yeast cells digest the sugar, begin to divid, and increase in number, producing CO2 to inflate the balloon.
Creating Other Planetary Environments
- Mercury is very hot. Boil the water before adding the sugar and yeast.
- Venus is hot and has an acidic environment. Boil orange juice and add to the bottle instead of water and sugar. You can add lemon juice or vinegar to make the environment even more acidic.
- Mars is very col. Freeze the yeast first before adding to the water.
Winter is the perfect time to do fantastic frozen science! In this activity, experiment with melting ice using salt and liquid watercolors/food coloring. When salt is generously applied to a large piece of ice, it begins to crack and melt. When coloring is added, the fissures, cracks and tunnels the ice become very “clear”! We see ice melting and refreezing all the time on Earth, and we can even see it happening on other worlds in our Solar System!
Supplies:
-Water
-Freezer
-Plastic/glass container or medium-sized bowls (for making the ice)
-Liquid watercolors OR food coloring
-Table salt (fine or coarse)
-Large tray or bin lid (clear or white is best)
-Small jars or cups for liquid watercolors/food coloring
-Spoons OR pipette/dropper (optional)
-Turkey baster (optional)
Step 1: Fill several bowls/containers with water and place overnight in freezer (fill at least ¾ full).
Step 2: Remove ice from freezer. To remove, run warm water over the ice and gently place on tray/bin lid (a large, flat surface like a kitchen table works best for this). Add an old towel or plastic drop cloth for extra protection.
Step 3: Pour some table salt into a bowl. Then, sprinkle some salt on each of the “ice domes.” Start with a small amount, since a little salt can go a long way!
Step 4: The salt should begin to melt the ice after a few minutes. Once you begin to see small rivulets of water, add small amounts of liquid water color to the top of the ice domes with your dropper or spoon (separate your colors into small jars/cups for easy access). For younger kids, it may take some practice to use the droppers.
Step 5: Note where the colors are pooling/running on the ice. Add more salt and color as necessary. Try adding more salt and color in one location on the ice to see what happens.
Step 6: You may have colorful water collecting and swirling around your drip tray. That’s OK–it’s a science experiment on its own! What kind of patterns are created? You can also reuse the color by using a turkey baster.
Step 6: Take your partially-melted, colorful ice dome outside and leave for a few hours in the cold weather. If sunny, hold up your ice dome to the sunlight. What do you notice?